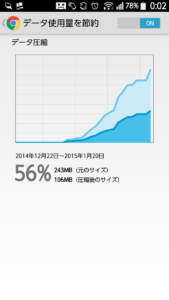
RabbIT ProxyはHTMLから不要な文字やコメントを削除したり、GZIPで圧縮したり、あるいは画像データの品質を下げるような変換をすることでデータ転送量を減らすソフトウェアです。その当りの仕組みはOpera Maxと同様ですが、自分でサーバーを用意するのであれば画像の品質をどの程度まで下げるのかなど、自由にパラメータ調整を行える分だけ、より使い勝手の良い通信料削減システムを構築できます。
RabbITはJavaで開発されておりWindowsでもLinuxでも動作します。今回はLinux上に構築してみます。
Java Runtimeのインストール
詳細は説明しません。最新のJava Runtimeをインストールします。最近のディストリビューションではOpen JDKがデフォルトになっていますが、Open JDKではjpeg画像ファイルを扱えないためRabbIT Proxyが動作しません。
RabbITのインストール
RabbIT Proxyをダウンロードします。http://www.khelekore.org/rabbit/から最新のバイナリをダウンロードします。ダウンロードしたrabbit4.xx-bin.tar.gzを解答すると、rabbit4.xxというフォルダが作成されます。後はrabbit4.xxフォルダに移動して次のコマンドを実行するだけです。
java -jar jars/rabbit4.jar -f conf/rabbit.conf
パソコンのブラウザでプロキシ設定を追加して、サーバーのポート9666に接続されるようにしてみましょう。Proxyとして動作しているはずです。
RabbITの設定
このままではセキュリティ上よろしくないのでいくつか設定を変更します。設定はconf/rabbit.confを変更します。
まずはポート番号を変えておきましょう。デフォルトは9666ですが、サイコロでも振って適当なポートに割り当てます。
# This is the port the proxy listens on.
# Use any port available (over 1024 unless you run as root).
port=9666
次にProxy接続時にユーザIDとパソワードを使うように変更します。
httpinfiltersの末尾に”,rabbit.filter.ProxyAuth”を追加します。
# Here we filter the HTTP header, these filters should have an
# public static HTTPHeader doHTTPInFiltering (Socket, HTTPHeader,
# Connection)
# method that may modify the incomming request. If a HTTPHeader is
# returned it is sent to the client and the request is finished. (this
# is an easy way to block some ads and other bad stuff).
# The list is comma separated and full class names has to be used.
#
# Available filters today are:
# HttpBaseFilter   this is basically needed, use it.
# DontFilterFilter stop the proxy from filtering certain pages.
# DontCacheFilter  stop the proxy from cacheing certain pages.
# BlockFilter      Dont allow access to certain pages.
# HttpSnoop        Print the Http headers out on System.out.
# ProxyAuth        Perform proxy authentication on all users, backend is some type of db
#                  This filter needs to be after HttpBaseFilter to work correctly.
# ReverseProxy     Transform requests to "/some/page" into "http://some.host/some/page"
#                  If you use the reverse proxy option, you probably
#                  want it first in the list
# NoGZipEncoding   A filter that removes "Accept-Encoding: gzip". Not very useful anymore
#                  since rabbit can repack gzip:ed and deflated files.
# RevalidateFilter A filter that makes sure that resources are always re-validated
# SetHeaderFilter  A filter that can add request or response headers.
# SQLBlockFilter   A filter similar to BlockFilter, but that uses a sql database to block
#                  access to a set of hosts
#
# by default we use a few filters,
httpinfilters=rabbit.filter.HttpBaseFilter,rabbit.filter.DontFilterFilter,rabbit.filter.BlockFilter,rabbit.filter.RevalidateFilter,rabbit.filter.ProxyAuth
Proxyに接続するためのユーザーIDとパスワードはconf/allowedに記述します。もともと書かれている”RabbIT:RabbIT”という記述を削除して、”example:password”を追加します。
ここで再びパソコンブラウザにProxyを設定してつないでみましょう。ちゃんとユーザー認証付きでつながりますか?
AndroidのProxyを設定
昔はAndroidのProxyを設定するにはroot権限取得とか脱獄が必要でしたが、今は脱獄せずにProxyを設定するツールも出ています。わたしはDronyを使ってProxyを設定しました。
 SETTING画面を表示して”Settings for not listed networks”をクリックします。これで下の画面が表示されます。
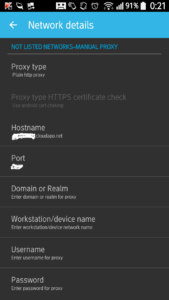
NOT LISTED NETWORKS-MANUAL PROXYの項目にProxyサーバーを設定します。Proxy TypeをPlain Http Proxyに、Hostname、Port,Username、Passswordをそれぞれ設定します。
このあとDronyによるフィルタリングを有効にすると、Proxyサーバー経由で通信が行われるようになります。
ちなみに、Proxy経由だと動作しなくなるソフトも多数あります。そういうソフトはFILTERのRulesでProxyを経由しないように個別にDirectに指定します。逆にDefault valueをDirect All(Proxyを経由しない)に指定しておいて、圧縮の効くソフトだけをRulesにAllowedで追加しても良いかもしれません。
というわけで、ちょっと技術には詳しいんだという方は試してみてはいかがでしょう?
念のためいくつか注意点も・・・
※自宅で普段使っているWindowsパソコンにProxyを導入してインターネットから接続を受け付けるサーバーとして使うことはお勧めしません。サーバーをインターネットに公開したとたんに、数多くのクラッカーからの接続が始まります。業務やプライベートなデータを取り扱うパソコンをサーバーにするのはやめましょう。
※可能なら接続元IPアドレスも制限しましょう。auやDocomoのスマホや携帯電話が使用するIPアドレスの範囲は公開されていますので、それらのIPアドレスからの接続を禁止すればより安心です。